
Fotoimpex 110-Professional Film Developer is a liquid concentrate rapid developer for use with black and white negative film. This developer’s characteristics include moderately fine grain, full shadow detail, a long density scale, wide development latitude, and no loss of film speed. Additionally, 110-Professional Film Developer is suitable for use when push-processing and stand development.
All developing times, dilutions, factors and replenishing rates are identical to Kodak HC-110 and can be applied. Fotoimpex 110-Professional Film Developer is very flexible and economical. It has a variety of different dilutions for different uses…up to 1:31. Shelf life is remarkably long.
SAFETY DATASHEET for Fotoimpex 110 Professional or Kodak HC-110 Developer.

Kodak Professional HC-110 Film Developer is a liquid concentrate rapid developer for use with black and white negative film. HC-110’s characteristics include moderately fine grain, full shadow detail, a long density scale, wide development latitude, and no loss of film speed. Additionally, this developer is suitable for use when push-processing.
Kodak Professional HC-110 Film Developer is very flexible and economical. It has a variety of different dilutions for different uses…up to 1:31. Shelf life is remarkably long.
SAFETY DATASHEET for Kodak HC-110 Developer.
The Brownie Camera Guy says:
HC110 Film Developer is a regular in my arsenal. I use it for very old films with great results. I’ve never had a roll of film be processed without some images, no matter how old, using HC110. Shelf life is the same as Rodinal, which is basically forever!
by Chuck Baker
Stand development is a film developing technique that utilizes a highly diluted developer and minimal to no agitation over a long period. This method aims to create a compensating effect, where highlights are controlled while shadow details are enhanced. Stand development is my go-to method when processing expired b&w films. I’ve had great success with this method even with expired film as old as the 1920’s!
1. Preparation:
- Load your film: Load your exposed film into a light-tight developing tank in complete darkness. You’ll find detailed film loading instructions here.
- Pre-wash (Optional but Recommended): Fill the tank with water at the same temperature you plan to use for your developer (usually around 20°C or 68°F). Tap the tank to release bubbles and let it stand for 1-2 minutes, sometimes longer for very old films. Then drain the tank. It may be colored because of a anti-halation layer, this is normal. Pre-washing saturates the emulsion helping to ensure even development and reduces the risk of air bubbles.
2. Mixing the Developer:
- Dilution: Stand development requires a very dilute developer solution. Common starting dilutions for popular developers are:
- Rodinal or Adonal: 1:100 (1 part Rodinal to 100 parts water) for a 1+ hour development is normal. Some photographers prefer a 1:200 for a 2+ hour development..
- HC-110: Dilutions like 1+119 (Dilution G) or 1+150 (Dilution J) are often used.
- *Minimum Amount – IMPORTANT: Ensure you use the minimum recommended amount of developer concentrate per roll of film. For Rodinal and Adonal it is generally advised to use at least 5ml per roll (35mm or 120). This means that a volume of 500ml is the minimum that can be mixed at 1:100 for any one roll of film. The HC-100 dilution for stand developing is 1:119. Also known as “dilution G”. It is recommended that you use no less than 6ml of the developer for each roll of film. So, for one roll, measure out 6ml of HC-110 and top it up to 720ml with water.
- Temperature: While stand development is less critical regarding temperature fluctuations than conventional developing, it’s still best to aim for the standard 20°C (68°F) if possible. Consistent temperature throughout the long development time is more important than hitting it precisely. When the tank is standing it is advisable to have it stand in a tray of 20°C (68°F).
3. Development:
- Pour Developer: After pre-wash, carefully pour the diluted developer into the tank. Read the bottom of the tank to assure you are using enough, or more, developer for the films being developed.
- Initial Agitation: Agitate gently for the first 30-60 seconds. This can be done by inverting the tank a few times. Tap the tank to dislodge air bubbles before starting the stand process.
- Stand Time: Let the tank stand undisturbed in a 20°C (68°F) water filled tray for a long period 1/2 of the full development time being used. Typical stand time is 60+ minutes, with some preferring up to 2+ hours, depending on the developer and dilution. Example: At 30 minutes for a 60 minute development, 2-3 gentle inversions with a final tap to dislodge any air bubbles will help prevent bromide drag. The tank is then placed back into the temperate water tray for the remainder of the development process.
- No Further Agitation: Avoid any further agitation during the remaining stand time.
4. Stop Bath (Optional): You’ll find detailed instructions for post developing here.
- After the development time, carefully pour out the developer. This is a one-shot process and cannot be reused.
- You can use a water stop bath by rinsing the film with water a couple of times. Some argue, myself being one of them, that with such high dilutions and long times, an acidic stop bath isn’t strictly necessary. However, others insist that a proper stop bath will immediately halt the development process and is generally good practice. Whichever you choose, water stop by rinsing or agitate the stop bath for 1 minute.
5. Fixer:
- Pour in your fixer solution according to the manufacturer’s instructions for dilution and time. Typically, agitation is required during fixing (e.g., continuous for the first minute, then a few inversions every minute for the remaining time).
6. Washing:
- Purpose: Proper washing removes all traces of fixer from the film emulsion and makes the film “archival”. When not properly washed, residual fixer will degrade the image over time causing staining and fading.
- Method 1 – Ilford Archival Wash Sequence: If your tank setup allows, you can insert a hose into the center column and wash with a slow, gentle flow of running 20°C/68°F water for 10-20 minutes.
- Method 2 – Ilford Archival Wash Sequence:
- Fill the tank with clean water at approximately the same temperature as the chemicals.
- Invert the tank 5 times. Drain.
- Refill the tank. Invert 10 times. Drain.
- Refill the tank. Invert 20 times. Drain.
- Hypo Clearing Agent – Optional: Using a hypo clearing agent like Kodak Hypo Clearing Agent or Ilford Washaid between the fixer and the final wash can significantly reduce wash times and improve archival permanence. *Follow the product instructions. An example is washing using the running water method for 5 minutes, clearing agent for 1-2 minutes and final wash for 5 more minutes.
7. Final Rinse and Drying:
- Purpose: Using a wetting agent, such as Adox Adoflo or Kodak Photo-Flo, prevents drying marks and water spots by reducing the surface tension of the water, allowing it to flow off the film smoothly during drying.
- Mix: Prepare a solution of wetting agent according to instructions or use just a few drops in a tank full of water. Using distilled or deionized water for this step is recommended if you have hard tap water.
- Rinse: Pour out the final wash water and pour in the wetting agent solution or add a few drops of the wetting agent to the final wash water in the tank .
- Agitate Gently: Slowly rotate the reel(s) in the solution for about 30-60 seconds. Avoid vigorous agitation, which creates excessive foam/bubbles that can leave marks.
- Drain: Carefully pour out the wetting agent solution. Do NOT rinse the film after this step.
- Remove the Film from the Reels: Carefully open the tank and remove the reel(s). The reels snap apart, when twisted, into 2 ends allowing the film to easily be removed. I suggest practicing snapping the reels apart before starting the development process. Remove the film but be gentle, the emulsion is soft and easily scratched when wet.
- Hang Film: Attach one film clip to the top end of the film strip. Attach another clip to the bottom end to act as a weight, keeping the film straight and preventing curling.
- Location: Hang the film in a clean, dust-free area where it won’t be disturbed. A bathroom after running a hot shower to settle dust often works well. Avoid dusty rooms or areas with lots of air movement.
- Time: Let the film hang until completely dry. This can take 2-4 hours or longer, depending on humidity. Resist the temptation to touch the emulsion side while it’s drying. Do not use excessive heat (like a hairdryer) unless using a dedicated film dryer, as it can damage the film or even increase the image graininess.
- Inspect: Once dry, you can handle the film carefully by the edges. Hold it up to the light or even better to use a light box to admire your negatives!
Tips and Considerations:
- Developer Choice: Rodinal, Adonal and HC-110 are popular choices for stand development due to their characteristics at high dilutions.
- Contrast: Stand development tends to produce negatives with lower contrast and enhanced shadow detail. You may need to adjust your scanning or printing process to achieve the desired contrast in your final image.
- Grain: Depending on the film and developer, grain might be more noticeable with stand development, especially with faster films.
- Bromide Drag: This can appear as streaks of uneven development, often originating from the sprocket holes on 35mm film. Gentle agitation halfway through development can help mitigate this.
- Halo Effects: In high-contrast scenes, stand development can sometimes lead to slight halo effects around bright areas.
- Experimentation: Stand development can yield varied results depending on the film, developer, dilution, and stand time. Experimentation is key to finding what works best for your needs.
- Minimum Developer Amount: Always adhere to the minimum recommended amount of developer concentrate to ensure proper development. Insufficient developer can lead to underdeveloped negatives.
I always use a Rodinal stand development with expired films and not so old to extremely old films that storage conditions are unknown. Because contrast is diminished, I do not stand develop newer fresh films opting instead to do active development for better contrast and midtones. Stand development can be a forgiving and convenient method, especially for developing rolls with varying exposures or when precise timing and agitation are difficult. However, be aware of its potential effects on contrast and grain, and be prepared to experiment to fine-tune your process.
Bergger is a French manufacturer with a long history in photographic materials, known for producing high-quality black and white films. Currently, their main film offering is Bergger Pancro 400, available in 35mm and 120 roll film.
- ISO: 400
- Type: Panchromatic Black and White Negative Film
- Emulsion: Features a unique dual-layer emulsion composed of silver bromide and silver iodide crystals of different grain sizes. This dual emulsion is a key characteristic of Pancro 400, contributing to its wide exposure latitude and tonal range.
- Grain: Generally described as fine to moderate for a 400 ISO film. Some users find it slightly more noticeable than some modern 400-speed films but appreciate its classic, pleasing grain structure. The grain can be more apparent in 35mm format compared to 120 or large format.
- Sharpness: Offers good sharpness and detail rendition, especially in medium and large formats. In 35mm, the sharpness is still respectable, although the grain might slightly impact the perception of extreme sharpness.
- Contrast: Typically exhibits medium to low contrast, which is often cited as a significant advantage. This lower contrast allows for excellent detail retrieval in both highlights and shadows, making it very versatile for various lighting conditions and amenable to different development techniques and printing/scanning adjustments.
- Tonality: Known for its exceptional tonal range and smooth gradations, often described as “silvery” or having a classic look. The film excels at capturing subtle grey tones and nuances.
- Exposure Latitude: One of the standout features of Bergger Pancro 400 is its wide exposure latitude. It is reported to handle underexposure and overexposure well (some suggest usable from EI 100 to 1600 with development adjustments), making it forgiving and suitable for older cameras with potentially less accurate metering.
- Reciprocity Failure: Specific data on reciprocity failure for Pancro 400 is less commonly detailed, but as with most black and white films, long exposures will likely require some compensation.
- Base: Coated on a clear PET (polyester) base, which is known for its stability and resistance to tearing. It features an undercoated anti-halation layer that clarifies during processing, contributing to high resolution and sharpness. It also has an anti-curling layer, although some users have noted that the film can still exhibit some curl.
- Developing: Compatible with a wide range of black and white developers. Many users report excellent results with classic developers like D-76 and HC-110, as well as finer-grain developers. Development times vary depending on the developer and desired contrast. Some recommend rating the film slightly lower than box speed (e.g., ISO 200-320) for optimal shadow detail, especially when using certain developers.
- Scanning/Printing: Scans very well, capturing the film’s wide tonal range and detail. The negatives tend to be relatively flat due to the lower contrast, providing a good base for digital manipulation to achieve the desired look. Prints beautifully in the darkroom, offering a rich tonal scale and good response to contrast control with paper grades.
- Formats: Available in 35mm, 120 roll film, and various sheet film sizes (4×5, 5×7, 8×10, etc.), making it a versatile choice for different camera systems.
- Overall Impression: Bergger Pancro 400 is highly regarded for its exceptional tonality, wide exposure latitude, and classic rendering. It’s a favorite among photographers who appreciate a film that offers flexibility in exposure and development, providing a rich, detailed negative suitable for both scanning and traditional darkroom printing. While the grain might be slightly more noticeable than some modern films, it’s generally considered pleasing and part of its character. Its availability in various formats further enhances its appeal.
In Conclusion:
Bergger primarily stands out with its Pancro 400, a versatile, well-regarded, reliable and high-performing black and white film known for its exceptional tonality and wide exposure latitude.
Kentmere is a brand of black and white photographic films produced by Harman Technology, the same company that manufactures Ilford films. Originally an independent company founded in 1919 in Staveley, Cumbria, UK, as The Britannia Works Company Ltd., Kentmere initially focused on photographic paper before expanding to films. In 2007, Harman Technology acquired Kentmere Photographic Ltd., and production was moved to Mobberley. The Kentmere brand was reintroduced in 2009 with the aim of offering more budget-friendly alternatives to Ilford films, particularly targeting students and those new to black and white photography.
Currently, Kentmere offers two main film stocks: Kentmere Pan 100 and Kentmere Pan 400. Both are panchromatic black and white negative films available in 35mm and 120 formats.
- ISO: 100
- Grain: Generally described as fine-grained for a budget-friendly film. While not as ultra-fine as some premium 100 ISO films, it offers good detail without excessive graininess, especially in good lighting conditions and with appropriate development.
- Sharpness: Offers good sharpness and detail rendition, suitable for general photography and moderate enlargements.
- Contrast: Typically characterized as having medium to good contrast, often described as punchier than Kentmere 400. Some users find it handles contrasty scenes well, retaining detail in both highlights and shadows, although careful exposure is recommended.
- Tonality: Provides a good tonal range with smooth gradations, allowing for a pleasing monochrome look.
- Exposure Latitude: Possesses a decent exposure latitude, offering some forgiveness for slight over or underexposure, which is beneficial for beginners. Overexposing slightly (metering at ISO 50-80) is often recommended to retain shadow detail.
- Reciprocity Failure: Information on specific reciprocity characteristics for Kentmere 100 is less readily available, but like most black and white films, it will exhibit some failure with very long exposures, requiring compensation.
- Base: Typically has a clear base.
- Developing: Compatible with a wide range of black and white developers (e.g., D-76, HC-110, Ilfosol 3). Results can vary depending on the developer used, with some combinations enhancing sharpness or grain.
- Scanning/Printing: Scans well, capturing good detail and tonality. Prints well in the darkroom, offering good density and contrast control with appropriate paper grades.
- Overall Impression: Kentmere Pan 100 is often praised as an excellent value film, providing good image quality at an affordable price point. It’s considered a versatile film suitable for various subjects, especially in well-lit conditions where its finer grain and good sharpness can be fully utilized. It’s a popular choice for beginners, students, and photographers looking for a cost-effective everyday black and white film.
- ISO: 400
- Grain: Noticeably grainier than Kentmere 100, as expected for a higher-speed film. The grain is often described as classic and not overly intrusive, providing a traditional black and white film look.
- Sharpness: Offers good sharpness, although slightly less than Kentmere 100 due to the higher speed and grain structure. Still capable of producing detailed images, especially at smaller print sizes or when viewed as scans.
- Contrast: Generally described as having moderate to slightly lower contrast compared to Kentmere 100. This can be advantageous in scenes with high dynamic range, allowing for more detail to be captured in both shadows and highlights. Contrast can be adjusted during development and printing/scanning.
- Tonality: Provides a good tonal range, with smooth transitions between different shades of grey.
- Exposure Latitude: Known for having good exposure latitude, often cited as being quite forgiving of underexposure, making it a flexible film for varying lighting conditions. Many users recommend erring on the side of overexposure to maximize shadow detail.
- Reciprocity Failure: Similar to Kentmere 100, specific data is less common, but compensation will likely be needed for long exposures.
- Base: Typically has a clear base.
- Developing: Versatile in terms of development, working well with many standard black and white developers. Pushing the film to higher ISOs (e.g., 800 or 1600) is also possible with appropriate development adjustments, resulting in increased grain and contrast.
- Scanning/Printing: Scans well, and the grain can be either embraced as part of the aesthetic or managed to some extent during the scanning process. Prints well in the darkroom, offering good density and tonal control.
- Overall Impression: Kentmere Pan 400 is a popular choice for photographers needing a faster black and white film for lower light conditions or faster shutter speeds. Its good exposure latitude and moderate contrast make it a versatile option for various subjects, including street photography, portraits, and general documentary work. While grainier than its ISO 100 sibling, it offers a classic look and remains an excellent value for its speed and performance.
General Observations about Kentmere Films:
- Value for Money: The primary appeal of Kentmere films is their affordability, making them one of the most budget-friendly options for black and white photography.
- Relation to Ilford: While produced by Harman Technology, Kentmere films are positioned as the more economical line compared to Ilford films like HP5 Plus or FP4 Plus, which are often considered to have finer grain and potentially greater sharpness and tonal range.
- Beginner-Friendly: Their good exposure latitude and compatibility with standard developers make them suitable for those new to film photography and black and white processing.
- Availability: Kentmere films are generally widely available in various formats (35mm and 120).
- Packaging: The packaging was refreshed in 2018 to align with Harman Technology’s branding.
In conclusion, Kentmere Pan 100 and Kentmere Pan 400 offer a fantastic entry point into black and white film photography or a cost-effective option for experienced users. They provide a classic black and white look with good overall image quality for their price, making them a popular choice in the analog community. While they might not have the ultra-fine grain or subtle tonality of some higher-end films, their performance and affordability make them a compelling option for everyday shooting and experimentation.
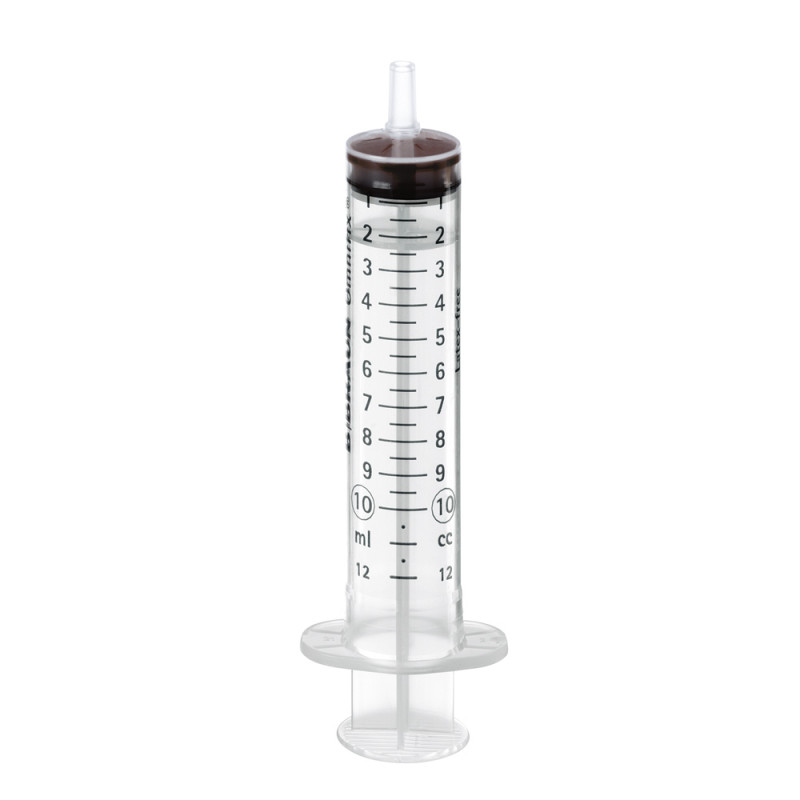
Braun Omnifix 10ml syringes are particularly well suited for measuring high dilution developers like Rodinal, Adonal and HC-110. This syringe gives super accurate measurements to .5ml increment. Perfect for measuring out 1:50 or 1:100.
These Braun 10ml syringes are made of polypropylene and are latex-free.
The Brownie Camera Guy says:
When mixing Rodinal or other 1:25 – 1:100 type high dilution developers, using a small-sized accurate syringe is the best and quickest way to measure the chemical. Then using a larger graduated cylinder is the best way to measure out the water for final mixing.
