by Chuck Baker
For those of you who want to take their black & white images to the next level, processing black and white film at home is easier than you may have thought. It is very satisfying and a good way to become intimate with your images.
In this simple guide, you’ll walk through the entire process and help you embrace good darkroom technique. Whether you’re a seasoned film photographer or just starting your analog photography journey, processing your own film can give you a deeper understanding for the craft.
This how-to is a tutorial about developing “regular” black & white film using materials and techniques that work well for me.
I. Preparation: Gather Your Materials & Prepare Chemicals
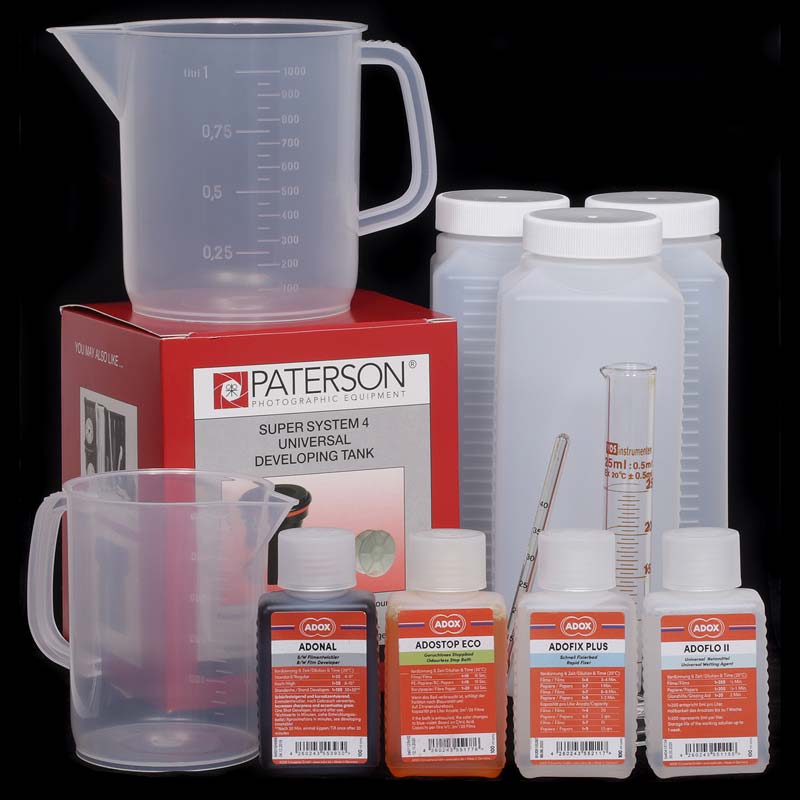
- Gather Equipment:
- Developing Tank & Reels: e.g., Paterson, AP – Ensure they are clean and completely dry.
- Exposed Black & White Film: 35mm | 120 roll film | 127 roll film | 620 roll film
- Changing Bag OR a Completely Dark Room with absolutely no light leaks.
- Film Cassette Opener for 35mm, roll film does not need an opener.
- Scissors
- Chemicals:
- Film Developer for B&W (e.g., Rodinal | D-76 | etc)
- Stop Bath: Optional, a water stop bath can be used. Indicator stop bath changes color when exhausted.
- Fixer: Rapid fixer is common.
- Wetting Agent: e.g., Adox Adoflo | Kodak Photo-Flo 200 | etc…
- Graduated Cylinders/Measuring Jugs: Avoid cross-contamination.
- Thermometer : An accurate photographic thermometer is recommended
- Timer
- Water Source
- Film Clips or Hangers (two per film)
- Storage Bottles for Mixed Chemicals (if reusing)
- Funnel: Optional
- Gloves & Apron (recommended for handling chemicals)
- Optional: Distilled Water for final rinse.
- Optional: A Starter Kit with most of the equipment needed.
- Prepare Chemicals:
- Read Instructions: Carefully read the instructions for your specific developer, stop bath, and fixer. Pay close attention to dilution ratios, recommended temperatures, and development times for your specific film. Websites like the Massive Dev Chart (digitaltruth.com) are excellent resources for times.
- Mix Chemicals: Mix the required amount of developer, stop bath, if used, and fixer according to instructions. You need enough solution to completely cover the film reel(s) inside your tank. Check the tank’s volume markings found on the outside bottom of the tank. Use separate, clean measuring containers or if the chemistry is premixed and in a storage bottle, pour directly from the bottle making sure you use at least the the amount indicated on the film tank bottom.
- Temperature Control: This is critical, especially for the developer. Bring the developer to the recommended temperature, most often 20°C / 68°F, but check the instructions. You can use a water bath by placing the chemical container in a larger basin of warmer or cooler water to adjust and maintain the temperature. Another method is to spray hot or cold water on the exterior of the bottled chemical until 20°C / 68°F is reached and then place the bottle in a bath of 20°C / 68°F to maintain the temperature. Ensure the stop bath, if used, and fixer are also reasonably close to this temperature, within a few degrees, to prevent sudden temperature shocks to the film.
- Set Up Your Workspace:
- If using a darkroom, ensure it’s completely dark. Let your eyes adjust for a few minutes and check for light leaks.
- If using a changing bag, place the tank (disassembled: tank body, lid, reel(s), center column), scissors, film canister/roll, and canister opener (if needed) inside the bag before zipping the bag closed and inserting your arms up to your elbows into the armholes.
- After loading your film into the developing tank, lay out your prepared chemicals, timer, thermometer, and jugs near where you will be developing the film.
II. Loading the Film into the Tank (Total Darkness Required)

- THIS ENTIRE STEP MUST BE DONE IN ABSOLUTE, TOTAL DARKNESS OR INSIDE THE CHANGING BAG. Film is extremely sensitive to light before it’s fixed.*
- PRACTICE MAKES PERFECT! If you’re new to this, sacrifice a roll of scrap film or an unexposed roll and practice loading the reel in daylight, then with your eyes closed, and finally inside the changing bag/darkroom until you can do it confidently by feel alone.
- Open the Film:
- 35mm: Use the cassette opener to pry off the end cap of the metal cassette. Remove the film spool. Be careful not to scratch the film.
- 120 and other Roll Film: Break the seal tape. Carefully unroll the backing paper until you reach the film start, which is usually taped to the paper. Detach the film from the tape. Continue unrolling, letting the film curl naturally emulsion side in (usually the dull side). The backing paper will separate as you unroll.
- Prepare Film End:
- 35mm: Cut off the shaped “leader” at the beginning of the film strip, making a straight, clean cut across the film, just past the leader. You can slightly round the corners with the scissors to aid loading.
- 120 and other Roll Film: Ensure the end you start loading is straight across.
- Load the Reel: (This process varies slightly depending on the reel type. These instructions are typical for Paterson and AP plastic reels)
- Hold the reel correctly (check for markings indicating film entry point).
- Feed the prepared end of the film under the small ball bearings or clips at the entry point of the reel spiral. Feed in about an inch or two.
- Gently push the film until it catches in the spiral grooves.
- Hold one flange of the reel steady and rotate the other flange back and forth (like twisting a lid). The ball bearings will grip the film and pull it into the reel’s spiral grooves.
- Keep a slight tension on the film feeding into the reel to prevent buckling. If you feel resistance, stop. Gently pull the film back slightly and try the rocking motion again. Don’t force it, as this can kink or buckle the film.
- Continue until the entire film is loaded onto the reel.
- Cut the Film End:
- 35mm: Cut the film straight across to free it from its central spool.
- 120 Film: Detach the film from the tape holding it to the end of the backing paper, if not already detached.
- Assemble the Tank:
- Place the loaded reel onto the tank’s center column/spindle. If loading multiple reels, stack them.
- Place the center column with the reel(s) into the tank body.
- Fit the main funnel lid securely onto the tank body. This lid is light-tight. Turn clockwise and ensure that it clicks or screws firmly into place. Some tanks have an additional small cap for the funnel opening.
- Check Seal & Turn on Lights: Double-check the main lid is securely fastened. Once you are certain the tank is properly sealed, you can turn on the room lights or open the changing bag.
III. Chemical Processing (Normal Room Light)

- Pre-Wash (Optional but Recommended):
- A pre-wash helps bring the film and tank to a stable temperature, removes the anti-halation layer (which can sometimes color the developer), and promotes even development.
- Pour clean water at the developer temperature (e.g., 20°C/68°F) into the tank via the funnel lid until full.
- Agitate gently, tap the tank to remove air bubbles and let sit for 1 minute.
- Pour out the water. It may be colored because of a anti-halation layer, this is normal.
- Developer:
- Final Temp Check: Double-check your developer temperature is correct just before pouring into the tank to start the developing process.
- Start Timer & Pour: Start your timer as you begin pouring the developer smoothly and quickly into the tank through the funnel lid.
- Agitation: This is crucial for even development. There are different methods, such as Ilford’s standard, so whatever method you follow, consistency is important.:
- Immediately after pouring, securely cap the funnel opening or top of the tank, and invert the tank gently and continuously for the first 20-30 seconds. I recommend 12-15 inversions.
- Tap the tank firmly on the counter a couple of times to dislodge air bubbles clinging to the film.
- For the rest of the development time, perform 2-3 inversions for 5 seconds at the start of each half minute then tap for air bubbles and repeat after 25 seconds for the development duration. Many others prefer 4-6 inversions every minute then tap for air bubbles and repeat after 50 seconds for the development duration. Whichever you decide to use for this type of processing, be consistent. Additionally, look for and follow the specific agitation pattern recommended by your film or developer manufacturer if provided. Consistency is key.
- Drain: About 10-15 seconds before the development time expires, remove the cap and start rapidly pouring the developer out of the tank. Do not remove the inner light-tight funnel, just the outer watertight cap before rapidly pouring the developer out of the tank. Note that some developers are one-shot, like Rodinal and Adonal, while others can be reused, like D-76 and ILFOTEC DD-X. Check instructions and store appropriately if reusing.
- Stop Bath: Optional
- Pour: Immediately pour in the stop bath. Immediately after pouring, securely cap the funnel opening or top of the tank.
- Agitate: Agitate continuously with gently inversions and/or swirling for the recommended time, usually 30-60 seconds. Stop bath neutralizes the developer quickly.
- Drain: Pour out the stop bath. Stop bath can usually be reused several times until exhausted. Indicator stop changes to a purplish color when exhausted.
- Using a Water Stop Bath : Water can be used instead of a stop bath, if desired. I use the running tap water, set to 20°C/68°F, and repeat filling and emptying the tank 4 times through the light tight opening, usually taking about 1 minute.
- Fixer:
- Pour: Pour in the fixer. Start the timer.
- Agitate: The agitation pattern similar to the developer is fine.
- Time: Fix for the recommended time, usually *4-10 minutes for rapid fixers. It’s a good idea to check the fixer instructions. It’s generally safe to fix slightly longer, but under-fixing is bad as it can leave the film milky and light-sensitive.
- *A Test for Fixing Time Needed: Before starting the developing process, take the undeveloped leader cut from the film and submerse it in the fixer you are about to use. Agitate it a bit and note the time duration it takes for the film to be semi to fully transparent. Double that time when fixing your newly developed film in the tank.
- Drain: Pour the fixer back into its storage bottle. Fixer can be reused until exhausted. Check instructions for capacity and testing methods. I usually make new fix when *testing for fixing time reaches 5 minutes to achieve semi to fully transparent film.
- Film is now light-safe: The tank can now be opened.
IV. Washing

- Purpose: Proper washing removes all traces of fixer from the film emulsion and makes the film “archival”. When not properly washed, residual fixer will degrade the image over time causing staining and fading.
- Method 1 – Ilford Archival Wash Sequence: If your tank setup allows, you can insert a hose into the center column and wash with a slow, gentle flow of running 20°C/68°F water for 10-20 minutes.
- Method 2 – Ilford Archival Wash Sequence:
- Fill the tank with clean water at approximately the same temperature as the chemicals.
- Invert the tank 5 times. Drain.
- Refill the tank. Invert 10 times. Drain.
- Refill the tank. Invert 20 times. Drain.
- Hypo Clearing Agent – Optional: Using a hypo clearing agent like Kodak Hypo Clearing Agent or Ilford Washaid between the fixer and the final wash can significantly reduce wash times and improve archival permanence. *Follow the product instructions. An example is washing using the running water method for 5 minutes, clearing agent for 1-2 minutes and final wash for 5 more minutes.
How-To: Develop Black and White Photographic Film
V. Final Rinse Using a Wetting Agent
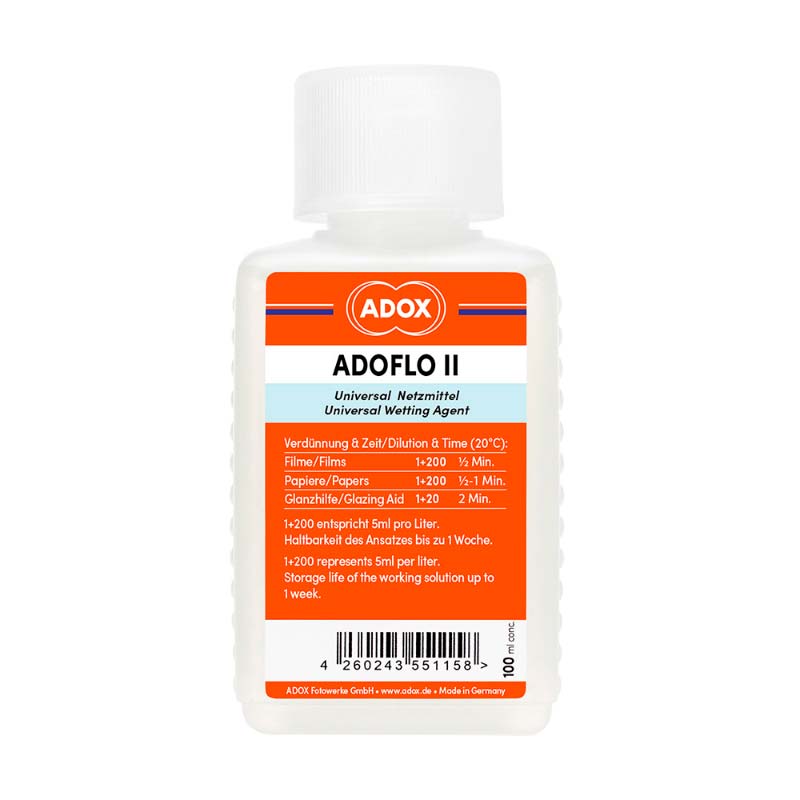
- Purpose: Using a wetting agent, such as Adox Adoflo or Kodak Photo-Flo, prevents drying marks and water spots by reducing the surface tension of the water, allowing it to flow off the film smoothly during drying.
- Mix: Prepare a solution of wetting agent according to instructions or use just a few drops in a tank full of water. Using distilled or deionized water for this step is recommended if you have hard tap water.
- Rinse: Pour out the final wash water and pour in the wetting agent solution or add a few drops of the wetting agent to the final wash water in the tank .
- Agitate Gently: Slowly rotate the reel(s) in the solution for about 30-60 seconds. Avoid vigorous agitation, which creates excessive foam/bubbles that can leave marks.
- Drain: Carefully pour out the wetting agent solution. Do NOT rinse the film after this step.
VI. Drying

- Remove the Film from the Reels: Carefully open the tank and remove the reel(s). The reels snap apart, when twisted, into 2 ends allowing the film to easily be removed. I suggest practicing snapping the reels apart before starting the development process. Remove the film but be gentle, the emulsion is soft and easily scratched when wet.
- Hang Film: Attach one film clip to the top end of the film strip. Attach another clip to the bottom end to act as a weight, keeping the film straight and preventing curling.
- Location: Hang the film in a clean, dust-free area where it won’t be disturbed. A bathroom after running a hot shower to settle dust often works well. Avoid dusty rooms or areas with lots of air movement.
- Time: Let the film hang until completely dry. This can take 2-4 hours or longer, depending on humidity. Resist the temptation to touch the emulsion side while it’s drying. Do not use excessive heat (like a hairdryer) unless using a dedicated film dryer, as it can damage the film or even increase the image graininess.
- Inspect: Once dry, you can handle the film carefully by the edges. Hold it up to the light or even better to use a light box to admire your negatives!
VII. Cleanup

- Chemicals: Store reusable chemicals, like the stop and fixer, in clearly labeled, airtight bottles. Dispose of exhausted or one-shot chemicals, especially developer and exhausted fixer, according to your local hazardous waste regulations. Do not pour exhausted fixer or undiluted developer down the drain.
- Equipment: Thoroughly wash the tank, reels, lid, thermometer, jugs, and funnel with warm water. Pay special attention to the reels to ensure no chemical residue remains in the grooves. Let everything air dry completely before storing and/or using again. Trying to load your film on a damp reel will mean disaster.
Important Considerations:
- Consistency: Maintain consistent temperature, timing, and agitation for repeatable results.
- Read Instructions: Always prioritize the instructions provided with your specific film and chemicals.
- Safety: It’s a good idea to wear gloves when handling chemicals, work in a ventilated area, and avoid splashes.
- Dust is the Enemy: Keep your workspace, equipment, and drying area as dust-free as possible.
Developing your own film is a fun and rewarding process. It will take you and your photography to a higher personal level. Take your time, be meticulous, and enjoy!